


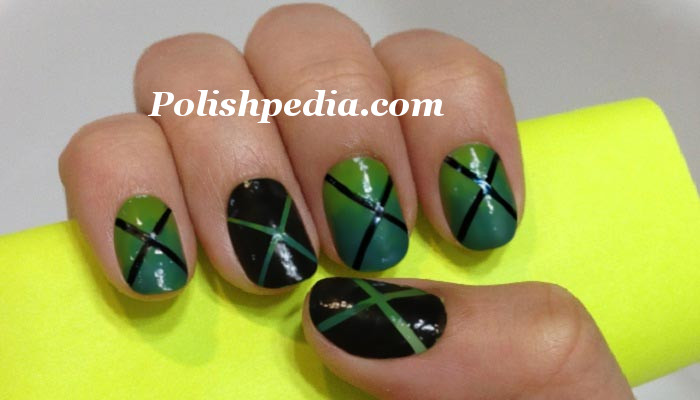
“X” Ombre Nails

Take The First Step!
Do You Have a Passion For Beauty?
"Of course you love anything related to beauty! That is why you are on Polishpedia. Why not take that love to the next level and become a beauty professional?The first step is to talk with some of the best cosmetology schools around the country. I have teamed up with some of the best and they would love to talk to you about what cosmetology can do for you. There is no obligation, just a chance to learn and take an awesome adventure into the world of beauty! ~ Jocelyn
"X" Ombre Nails Tutorial
1) First I rubbed cuticle oil on my fingernails, and then I added a base coat. Next, I painted two coats of Maybelline Color Show's "Go Go Green" nail polish.
2) I start off the design by beginning to do an ombre design. Cut out a small triangle from a make up sponge, and hold it with tweezers.
3) Then apply Revlon's "Trendy" nail polish on the sponge and dab it onto the nail from the middle up.
4) Next, I flipped my sponge and held it with the tweezers again. I applied on NYX's Indigo Blue on to the sponge, and dabbed the sponge onto the very tip of my nail.
Keep in mind this is my personal method for doing Ombre, when trying out this design, if you find this difficult, check out Jocelyn's tutorial video on how to do Ombre nails.
5A) Now that I've finished doing my Ombre design, I took my black nail tape and held it beside my nail with my thumb as I stretched the tape across my nail with my left hand. It is okay if the tape overlaps the nails and sticks off to the side, just make sure it is pressed against the nail firmly and will not pop up.
5B) Repeat Step 4, except now, you are placing the tape in the opposite direction, making an "X" shape. Do this this procedure to all of your nails.
6) Apply a top coat over your nails, do not trim the nail tape yet.
7) Using Wet n Wild's "Ebony Hates Chris", paint two coats of the black nail polish on your ring finger and thumb finger over the tape.
8) When the black nail polish is almost done drying, remove the tape slowly and carefully. Apply a top coat.
9) Now that your top coats have dried, feel free to trim the excess nail tape with nail clippers or cuticle nippers.
10) Apply a second top coat for security and to prevent nail tape peeling.
 Step 1
 Step 2
 Step 3 & 4
 Step 5
 Step 6
 Step 7
 Step 8
Nail Art By
Products Used
More Nail Art Videos

Copyright © 2026 Polishpedia: Nail Art | Nail Guide | Shellac Nails | Beauty Website. All Rights Reserved.
Privacy Policy
Privacy Policy