


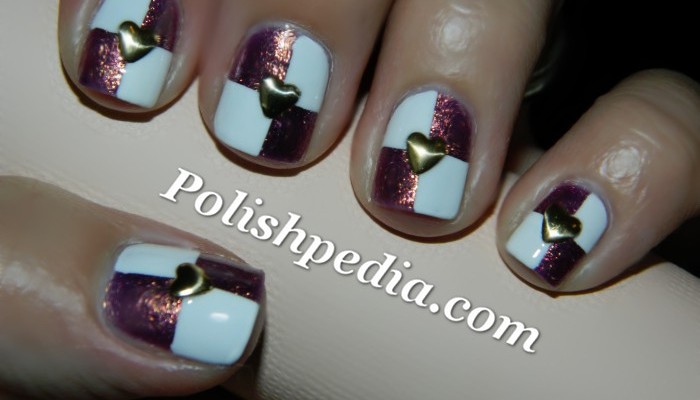
Studdded Checker Nails

Take The First Step!
Do You Have a Passion For Beauty?
"Of course you love anything related to beauty! That is why you are on Polishpedia. Why not take that love to the next level and become a beauty professional?The first step is to talk with some of the best cosmetology schools around the country. I have teamed up with some of the best and they would love to talk to you about what cosmetology can do for you. There is no obligation, just a chance to learn and take an awesome adventure into the world of beauty! ~ Jocelyn
Checker Nails
What I used for these studded checker nails
1. OPI It's My Year2. Sally Hansen White On
3. Seche Vite
4. Scotch Tape
5. Small gold heart studs
6. An orange wood stick
This design is much simpler than it looks thanks to the Scotch tape. I started with a couple coats of It's My Year. Once it had dried completely, I used two pieces of tape and taped off a quarter of my nail. I used White On and removed the tape. Once dry, I taped off another quarter to make a checker pattern. I topped it with Seche Vite and while it was still wet, I applied the studs. To pick up and place the studs, I used the pointy end of an orange wood stick that I dipped in top coat. After placing the studs, I used another thick coat of Seche Vite to smooth things out and give the studs a little more security.
This nail art was SO FUN to wear! I got a ton of comments on them and the studs just add that little something to take them over the edge.
Nail Art By
Products Used
More Nail Art Videos

Copyright © 2026 Polishpedia: Nail Art | Nail Guide | Shellac Nails | Beauty Website. All Rights Reserved.
Privacy Policy
Privacy Policy