


Bow Tie Nails

Take The First Step!
Do You Have a Passion For Beauty?
"Of course you love anything related to beauty! That is why you are on Polishpedia. Why not take that love to the next level and become a beauty professional?The first step is to talk with some of the best cosmetology schools around the country. I have teamed up with some of the best and they would love to talk to you about what cosmetology can do for you. There is no obligation, just a chance to learn and take an awesome adventure into the world of beauty! ~ Jocelyn
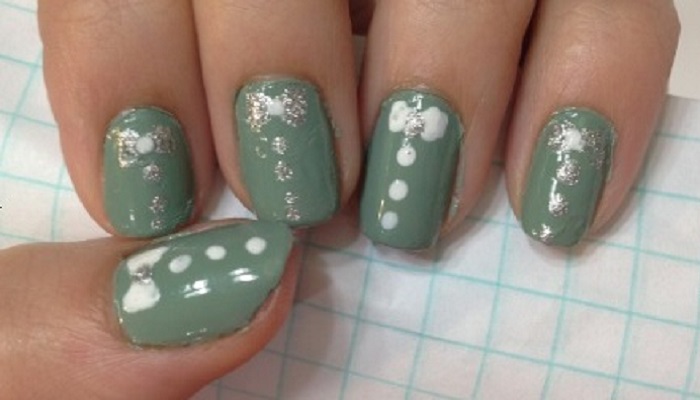
Bow Tie Nail Art Tutorial

- First, I did basic procedure; I rubbed cuticle oil on my finger nails and then added a base coat. After the base coat has dried, I painted two coats of O.P.I's Thanks A Windmillion.
- I dripped a few drops of Confetti Nail Polish's Wedding White on to a sheet of paper.
- I started painting onto my ring finger. I then took a small dotting tool and made a triangle above my cuticle that points towards the center of my nail. I then made a reflection of this triangle on the same nail.
- Using the same color nail polish, add a vertical dotted line below your bow, this will give the effect of buttons on a dress shirt.
- This is where I took my China Glaze Silver Lining Nail Polish and added a small dot in the center of my two triangles. You've finished making your bow! Repeat the design on your thumb finger to complete both accent nails.
- Now I repeat the design I have down on my accent nails onto my index, middle, and pinkie finger! Except this time, I make my two triangles and dotted line with the China Glaze Silver Lining Nail Polish and dot the center with the white nail polish.
- And finally finish off with a top coat and enjoy your beautiful Bow Tie Design!
Nail Art By
Products Used
More Nail Art Videos

Copyright © 2026 Polishpedia: Nail Art | Nail Guide | Shellac Nails | Beauty Website. All Rights Reserved.
Privacy Policy
Privacy Policy